Put your product manual behind one QR code
A practical guide for manufacturers: which kind of QR code to print, what customers should find when they scan it, how big to print it, and which information the law still wants on paper.
- Last reviewed
- Reading time
- 13 min read
- Status
- General information, not legal advice
Why the paper manual stops working
The printed manual is written months before a product ships, translated into every language it might be sold in, and then frozen. By the time a customer opens the box, the firmware has changed, the support number has moved and the most common question is answered on page 34, if it is answered at all. Many booklets end up in a drawer, or in the bin with the packaging.
Customers have not stopped needing help. They have moved to their phones. When something goes wrong they search for the model number, find a forum thread or a three-year-old video, and then call your support line. Every one of those calls is a question your documentation could have answered.
A QR code on the product or the box closes that gap. It turns the moment a customer needs help into one scan with the phone camera they already hold, and it lets you change what they find after the box has left the factory. Whether that works depends on three decisions: what the code points to, what is on the other side, and how it is printed.
Static QR, dynamic QR or a product page
There are three common ways to put a manual behind a QR code. They look the same on the box; they behave very differently five years later.
- A · Static QR
Encodes a file address
Points straight at a PDF. Free and permanent, but if the file moves or changes name, every printed code breaks.
- B · Dynamic QR
Encodes a redirect you rent
A short link you can repoint. Usually priced per code, sometimes per scan, and it stops redirecting when the subscription ends.
- C · Product page
Encodes the product’s own address
A permanent page for the model: manual, videos, guides, warranty, parts and support, in the order a customer needs them.
Static QR code to a PDF
A static code encodes the file address itself. It costs nothing and needs no subscription, which makes it fine for a single document that will never move. The weakness is the address: rename the file, change your website or switch hosting, and every code already printed breaks. A PDF is also a poor first screen on a phone. A customer who wants to know why a light is flashing has to pinch and scroll through a document laid out for A4.
Dynamic QR code from a generator
A dynamic code encodes a short link that the generator redirects to wherever you choose, so you can swap the PDF later. That fixes the broken-address problem, but you are renting the redirect. Generators usually price per code and some cap scans; several state in their own help pages that dynamic codes stop redirecting when the subscription ends. We compared the main ones in ItemDocs vs QR code generators, using their published documentation.
A permanent product page
The third option is a page made for one product model, at an address that belongs to the product rather than to a file. The manual is still there, but it sits alongside a setup sequence, short videos, searchable FAQs and troubleshooting. This is what ItemDocs does: every product gets a permanent six-character ID and a page at itemdocs.com/i/<ID>. The QR encodes that address, so you can replace the manual, add a video or post a safety notice without reprinting anything.
How to create a QR code for a product manual, step by step
To make a QR code for a user manual, prepare the manual as a phone-friendly file, publish it at an address that won’t change, encode that address in a code, test the printed result, and check it again once the product ships. The steps below work with any tool, including a free generator. Each one ends with how ItemDocs handles it.
- Decide what the code should open. Choose between a file, a redirect and a page, using the comparison above. Decide per model, not per colour: variants with identical documentation can share one code. In ItemDocs: create the product, and it gets its permanent ID at once.
- Prepare the manual. Export the PDF from your source file, not from a scan, so that its text can be searched and selected. Put the model name and a version on the first page, and check the file opens quickly on mobile data. In ItemDocs: upload the PDF, up to 50 MB. It opens in the page’s viewer with a version label, and its text is searchable.
- Publish it at an address that will last. The address must outlive your next website redesign and your next vendor. If you use your own site, write down who owns that path. In ItemDocs: the address is
itemdocs.com/i/<ID>and it doesn’t change when you replace the file. - Generate the code as vector artwork. Encode the shortest address you have, because a shorter address means larger modules at the same print size. Download SVG or PDF for the printer rather than a screenshot. In ItemDocs: download SVG, PNG or a print-ready PDF label with the ID and short address under the code.
- Test the artwork before the print run. Print it at final size on the real material, then scan it on more than one phone, including an older one. Size, placement and the scan test below has the details. In ItemDocs: the built-in scan test must pass before a code can be approved for print.
- Check it after it ships. Scan a packed unit from the first production run, and put a date in the calendar to review what people open and search for. In ItemDocs: the Console shows scans, searches and searches with no answer, per product.
What to put behind the code
Think about the order in which a customer needs things, not the order of the printed manual. Somebody scanning a new box wants to get started. Somebody scanning a two-year-old product wants a fix, a spare part or the warranty. A good page serves both without making either scroll past the other.
- Start Here. The ideal first-use journey in five or six steps: unpack, check the contents, connect, set up, try it. Link the setup video from the steps.
- Short videos. Unboxing, setup and the two or three tasks people find hard to describe in words. Keep them under two minutes and add captions.
- How-to guides. Step-by-step instructions with a photo or drawing per step, for tasks such as cleaning a filter, descaling or pairing an app.
- Troubleshooting. Organised by symptom (“won’t turn on”, “error light flashing”, “E4”), each with a short sequence of checks and a route to support if it is still not fixed.
- FAQs and search. The questions your support team answers every week, plus a search box. On ItemDocs, search also looks inside your PDF manuals.
- The full manual and other documents. The complete PDF, quick-start guide, safety instructions, declarations and certificates, with a version label so customers know which one they are reading.
- Warranty and registration. Duration, what is covered and how to claim, as plain text rather than a scanned card, with a registration form if you collect one. See warranty registration by QR code.
- Specifications, spare parts and accessories. The facts people look up later, and part numbers with a link to where they can be bought.
- Support and updates. Phone, email, hours and service centres, plus dated notices for firmware, documentation changes or safety issues.
You don’t need all of it on day one. A manual, Start Here, five FAQs and your support details already beat a booklet. Add troubleshooting and videos when your support team tells you what people keep asking, or when your search data does (see measuring it).
One code, every language
Translating a printed booklet means printing every language or guessing which ones each market needs. Online, one code can serve several languages. ItemDocs publishes a page in up to ten languages, including Hindi, Arabic and Chinese; customers switch language on the page, and anything not yet translated falls back to your default language rather than disappearing. Check the language rules of each market for safety information, which are covered below.
Size, placement and the scan test
A code that does not scan in a dim kitchen or a dusty workshop is worse than none, because the customer has lost the manual and the code. Most failures come from a handful of avoidable print decisions.
- Quiet zone
- 4 modules, kept clear of print
- Typed fallback
- If the code is scratched
- Size. Print the code at least 20 mm square. Phones can read smaller codes in good light, but 20 mm leaves room for curved surfaces, glossy film and older cameras. Go larger if the code will be read from a distance, such as on a machine guard.
- Quiet zone. Keep a clear margin of four modules (the small squares) on every side. The QR specification asks for it, and it is the margin designers most often fill with a border or a logo. ItemDocs downloads include it.
- Contrast. Dark modules on a light, matt background. Avoid reversed (light-on-dark) codes, metallic inks and printing over a photo or a seam.
- The ID underneath. Print the ID and short address below the code, for example
itemdocs.com/i/K7M4X9. If the code is scratched, a customer or a support agent on the phone can still reach the page. ItemDocs IDs avoid the characters O, 0, I, 1 and L, so they read correctly on a label and over the phone. - A reason to scan. Say what is behind it: “Scan for manual, setup video, warranty and support”. A bare code gets fewer scans.
Where to put it
Put one code where the customer looks first and another where they look later. The box or the first insert catches the setup moment. A label on the product itself, next to the rating plate or under the lid, is still there years later when the box has gone. If the product is too small for a label, use the packaging and the quick-start card. Our QR size and placement guide goes into detail by product type.
Test before you print
Scan the final artwork, not the design file, on more than one phone. In ItemDocs, the scan test decodes the PNG and SVG artwork, including a 20 mm rendering, then checks that the page responds, that it shows the right product and that its documents and videos load. A product can only be approved for print once that test passes.
What must stay on paper
A QR code can carry most of your documentation, but not all of it. Several rules require certain information to physically accompany the product, whatever you put online. In short:
- EU Machinery Regulation (EU) 2023/1230. From 20 January 2027, instructions for machinery may be provided in digital format, but the user must be able to download, print and save them; they must stay online for the expected lifetime and at least 10 years; a paper copy must be supplied free of charge within one month if the user asks at the time of purchase; and machinery for non-professional users must still come with the essential safety information on paper. Our Machinery Regulation guide explains each condition.
- EU General Product Safety Regulation (EU) 2023/988. Consumer products must be accompanied by clear instructions and safety information in a language consumers easily understand. The recitals mention QR codes as a way to provide information in addition. See GPSR and QR codes.
- India, Legal Metrology (Packaged Commodities) Rules. Since a 2022 amendment, electronic products may give some mandatory package declarations through a QR code, while others, such as the manufacturer, packer or importer name, stay on the package. The scope has been amended since, so check the current notification. See ItemDocs for Indian brands.
The practical pattern is the same everywhere: print a short safety sheet (and any label your product category requires), and move the full manual, setup videos, troubleshooting and warranty registration behind the code. You save most of the printing without removing anything a regulator expects to find in the box.
Measure what customers look for
Printed manuals give you no feedback. A product page does. The useful numbers are few:
- Scans and page opens, per product and over time, to see whether customers find and use the code.
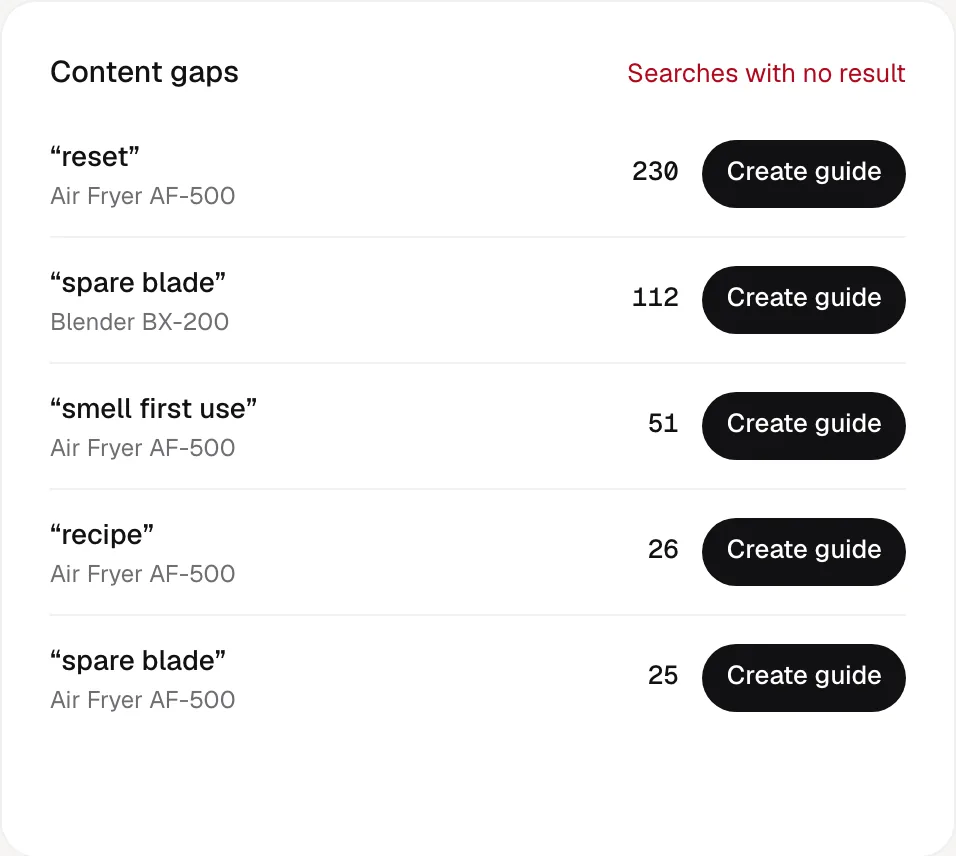
- What they search for, in their own words: “reset”, “filter”, “E4”, “warranty”.
- Searches with no answer. The most valuable list you will get: questions customers asked that your content does not answer yet. ItemDocs shows them as content gaps, so each one can become a guide or FAQ.
- What they open and watch: which guides, documents and troubleshooting issues get used, and how far people watch your videos.
Compare these with your support tickets for the same product. When the top search terms and the top ticket reasons match, you know exactly which page to improve first.
Rolling it out across a catalogue
One product is a design exercise. Two hundred is an operations problem. Plan for the catalogue from the start:
- Start with the product that generates the most support calls, not the newest one. You will learn more and see results sooner.
- Build one complete page as the template. In ItemDocs, a new product can copy an existing product’s content, which you then adjust.
- Import the rest of the catalogue. Product records come in from a CSV or Excel file (name, model, SKU and GTIN among them), and each gets its ID straight away.
- Hand the packaging team one file. Bulk export gives a ZIP with SVG, PNG and print-ready PDF per product, plus a CSV that maps each product to its ID and URL.
- Give people the right access. Owner, admin, editor and viewer roles keep agencies and translators away from billing, and the activity log shows who changed what.
A permanent code needs a permanent page. When a model is discontinued, keep its page live with a note and a link to the replacement; customers who bought it still need the manual. On ItemDocs, discontinued products keep their full page, and archived products keep their URL with a short page showing your support details, so no printed code ever leads nowhere.
Checklist before you print
- The code points to a permanent address you control, not to a file or a rented redirect.
- The page answers the first-use question (Start Here) and the “something is wrong” question (troubleshooting, support) without scrolling through the manual.
- The full manual is available to download and print.
- The legally required safety information is still printed in the box, in the right languages.
- The code is at least 20 mm, dark on light, with a four-module quiet zone.
- The ID and short address are printed under the code.
- A line of text tells customers what they get by scanning.
- The final artwork has been scanned on more than one phone, and the right product opens.
- Someone owns the page after launch and reads the unanswered-search list every month.
See it on a real page
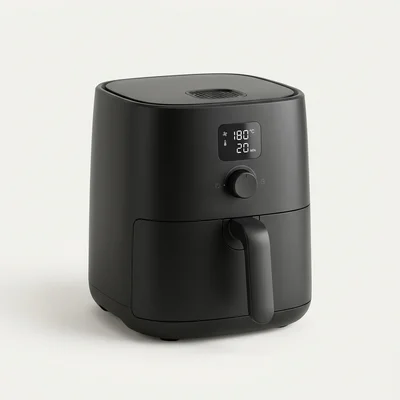
The demo is the page for a fictional air fryer, the Norra AF‑500, built with every module described here: Start Here with a setup video, an illustrated manual, eight how-to guides, troubleshooting for the E4 error, a two-year warranty with registration, spare parts and a Spanish translation. Open it on your phone, or read the section-by-section walkthrough.
Sources
Checked
Links open the original documents.
- [1]Regulation (EU) 2023/1230 on machinery, Article 10(7)EUR-Lex
- [2]Corrigendum to Regulation (EU) 2023/1230 (application date 20 January 2027)EUR-Lex
- [3]Regulation (EU) 2023/988 on general product safety, Article 9(7) and recital 32EUR-Lex
- [4]Legal Metrology (Packaged Commodities) Amendment Rules, 2023 (QR code)Department of Consumer Affairs, Government of India
- [5]ISO/IEC 18004:2024, QR code bar code symbology specificationISO
Related
- ComparisonItemDocs vs QR code generatorsPer-product pricing, scan caps and what happens when you stop paying.
- GuideModel-level vs serialised QR codesDo you need a different code on every unit? How to tell.
- Use caseReduce manual printing costsWhat can move online, with a calculator for your own numbers.
- GuideQR code size and placementMinimum size, quiet zone, contrast and where to put the code.
- IndustriesExamples by product categoryKitchen and home appliances, electronics, tools and machinery, furniture and lighting.
Give your first product a page today.
One product is free forever, with every module. No card required.
See pricing →